Django User Profile - Learn to code in Django
This article explains how to code a Django User Profile available for authenticated users outside of the admin module. The content might help beginners to learn new things about Django and code a real project with commercial value.
For newcomers, Django is the most popular Python-based web framework initially released in 2003 and currently a reference framework in web development.
The "batteries-included" concept and the built-in security patterns provided by experts make Django a software used by tech giants like Disqus and Instagram.
- Django User Profile - LIVE Demo
- Django User Profile - Source Code
- Django Bootstrap 5 Volt - The original starter
Django - Short Introduction
Django is an open-source framework that follows the MVT (Model View Template) architectural pattern. The framework emphasizes rapid development, code reusability on top of security best practices provided by experienced developers. A few reasons to use Django:
Complete, mature framework - The “Batteries included” philosophy provided by Django helps developers to implement faster common features like authentication, clean database access, REST services, and much more. Once the developers learn the framework, they can code with ease from simple, one-page sites to eCommerce platforms.
Secure - Versioned by experienced open-source enthusiasts, Django helps developers avoid many common security mistakes by providing modules and layers that have been engineered and tested to protect websites and projects deployed on the internet.
Versatile - Django can be used to code from simple sites to blog platforms, APIs, microservices, or heavy traffic eCommerce platforms. Many big companies like Instagram or Disqus choose Django as their core backend technology.
To read more about Django, feel free to access:
- Django - the official website
- Django Web Framework - Server-side programming
Starter Codebase
The “User Profile” feature is provided on top of a simple open-source project enhanced with a few basic features like authentication, a nice design, and deployment scripts for Docker and Gunicorn/Nginx stack.
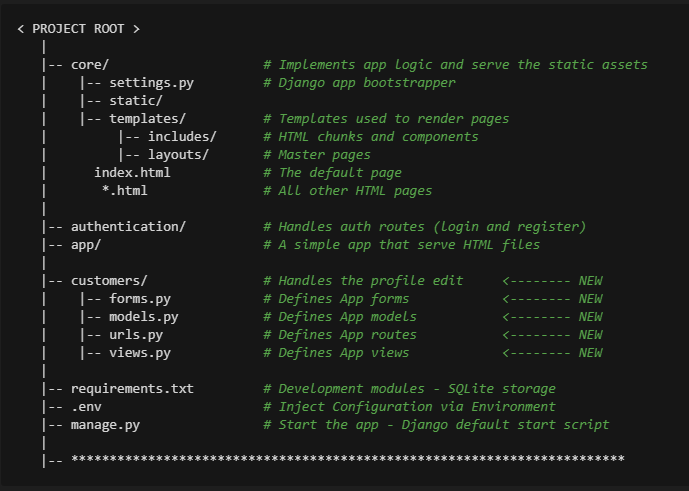
The modular structure uses “apps” to implement the project features:
- “Core” application handles the configuration and serves the static assets
- “Authentication” manage the login and register action to allow user onboarding
- “App” is a simple module that serves the private pages to authenticated users
- “Customers” is the new module that handles the profile editing feature
The bootstrap flow
- Django bootstrapper
manage.pyusescore/settings.pyas the main configuration file core/settings.pyloads the app magic from.envfile- Redirect the guest users to Login page
- Unlock the pages served by app module for authenticated users
- Users can update their profile and change Name, Surname, Birthday and Address.
The Source Code
To implement this feature we should code a few simple things using the tools provided by Django core. The first thing is to add a new “application” to separate the new logic and preserve the modular design of the existing code. To generate the app skeleton we will invoke the "startapp" command:
$ python manage.py startapp customers
Once the application is generated, the next step is to add a new table that saves the new fields:
- User, Birthday, Zip, City, Address, ZIP code
To effectively use the table we need to execute a new migration and apply the generated SQL to the database. The associated form will collect the information and submit the information provided by the user using a “POST” request.
The relevant files that provide this flow can be found below:
- The Profile model defined in
customers/models.py - The Profile form defined in
customers/forms.py - The Profile view template defined in
customers/views.py
The View (aka the controller) handles differently the request based on their type: "GET" requests will pull the information from the database and populate the form. If the type of the request is "POST" the information provided by the user is validated and saved in the database for later use.
The curious minds can compile and play with the code by following the build instructions provided in the README file, saved along with the source code on the Github public repository.
Thank you for reading! For more resources, please access:
- More Django Templates to get started fast
- More Admin Dashboards provided by AppSeed